Caramel-Coconut Cheesecake Bars
Tuesday, July 24, 2012
Click here to see all of our cheesecake recipes in one place!
Posted by Jen.
The Ingredients:
1/4 c butter, melted
3 8 oz pkg cream cheese, softened
3/4 c sugar
3 Tbsp corn starch
3 eggs
1 tsp vanilla
1/4 c heavy cream
1/2 c melted chocolate chips
caramel topping
shredded coconut (I forgot to measure. Maybe 1/2 a large bag, or the entire 7 oz bag)
1/4 c more melted chocolate chips
Directions:
Preheat oven to 325 degrees.
Line a 13 x 9 pan with parchment paper and let the paper have handle-like flaps over the edge. (for easy removal. See 2nd picture) Lightly spray the bottom and the sides with nonstick spray.
Place the graham cracker crumbs in a bowl. Pour in the melted butter and stir with a fork just until the crumbs are moistened.
Pour crumb mixture into a 13 x 9 pan and press well so the crumbs are all stuck together and even on the bottom. Notice the parchment paper flaps hanging over the edge?! Bake in an 325 degree oven for 10 minutes. When done then let it cool a bit while you prepare your cheesecake batter. Increase oven temperature to 350 degrees.
Meanwhile, prepare the cheesecake batter. Beat the cream cheese and the corn starch and 1/2 the sugar until it's smooth. No lumps. If there are a lot of lumps of cream cheese it means it wasn't softened entirely and may contribute to a cracking cheesecake. (not that it will matter with this particular cheesecake anyway, but just so you know). When it is all smooth, beat in the remaining sugar. Then add the vanilla and the eggs one at a time. Beat until smooth.
After it is all smooth, remove 1 cup of batter to another bowl. Melt 1/2 c chocolate chips and then stir the melted chocolate into the reserved cheesecake batter. Then you will have a chocolate cheesecake batter.
Pour the plain cheesecake batter into the pan, spreading it evenly. Then drop the chocolate batter in blobs all over the surface. Take a sharp knife and gently pull it through the chocolate blobs thus creating a swirl. Don't swirl too much, or you'll end up with a brown cheesecake.
Shortly before you want to serve it, toast your coconut. Turn on your oven to 400 degrees. Spread the coconut evenly on a baking sheet. Make sure that you will be available to watch the coconut. While it may start out slowly, it will burn very quickly if you're not watching. Don't let anything distract you from doing this.
After a few minutes you will notice some of the coconut turning a light brown. Now is the time to watch it like a hawk. Pull out the pan and toss the coconut around a bit to get it to evenly cook. Put back in oven and continue to toss the coconut every 30 seconds.
Evenly spread the coconut on top of the caramel.
Now, use those handy parchment paper handles and lift up your cheesecake out of the pan. Cut them into squares. Hint: I like to use a pizza cutter for easy even cuts.
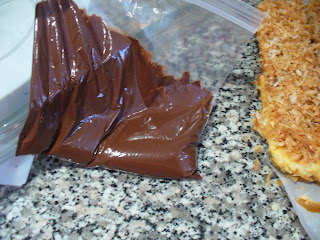
Right before serving, melt a 1/4 c chocolate chips into a baggie. (should take about a minute, but stop after 30 seconds and massage the chocolate to get the heat evenly distributed.) When it is all melted, then use scissors to cut a tiny hole out of one corner of the baggie. Twist the baggie at the top opened area and hold it with one hand while squeezing at the same time. Make sure that all the chocolate is melted first because that lone chocolate chip that didn't melt all the way will find a way to clog your hole and therefore cause your bag to burst while squeezing it.
Drizzle your melted chocolate across your cheesecake and serve right away.
Just so you know, when the chocolate chips cool, they will harden, so this is best served right after you drizzle. I put mine in the fridge after the chocolate drizzle and it hardened up before I served it and it was a pain to separate the squares with the nice drizzle on each one without breaking the chocolate lines. In this picture you can see how much easier it is to separate the squares while the chocolate is still melted.
*****************************
Want to see links to your favorite recipes from Recipe Shoebox in your Facebook feed? Be sure to "LIKE" our Facebook page!


5 comments:
These look amazing!! I really need to try these soon!
Looks fantastic!!!
I can't find the heavy cream in your instructions?
To Anonymous: Sorry about that. I add the cream after mixing in the eggs into the batter. Just beat the mixture until the cream is well blended in. If you'd like, you don't have to mix in any cream at all, I just think that it helps not get cracks in the end. If this were to get cracks, the it doesn't matter anyway because you're covering it up with chocolate! Enjoy!
Post a Comment